
Mastering the Art of Excel-Based Crossword Creation: A Step-by-Step Guide

Mastering the Art of Excel-Based Crossword Creation: A Step-by-Step Guide
Quick Links
- Step 1: Create Your Grid
- Step 2: Add Your Words
- Step 3: Black Out Empty Squares
- Step 4: Add Your Numbers
- Step 5: Write Your Clues
- Step 6: Remove the Words
- Step 7: Test Your Puzzle
Yes, there are websites and programs you can use to make a crossword puzzle, but none of those give you the satisfaction of crafting one from scratch. In this article, I’ll show you the seven steps you can take to become a fully-fledged cruciverbalist.
I’m going to run through how I create a crossword using Excel, but you can use any spreadsheet program, such as Google Sheets, to do the same thing.
Step 1: Create Your Grid
First, decide how big and what shape you want your crossword to be. Personally, I aim for a large, square-shaped puzzle, but if this is your first shot, it might be worth trying a smaller one—such as a 10 x 10—until you’ve got the knack of things. If you want a professional layout, The NYT goes for 15 x 15 for their daily puzzles and 21 x 21 on a Sunday. The Guardian’s crossword is 13 x 13 .
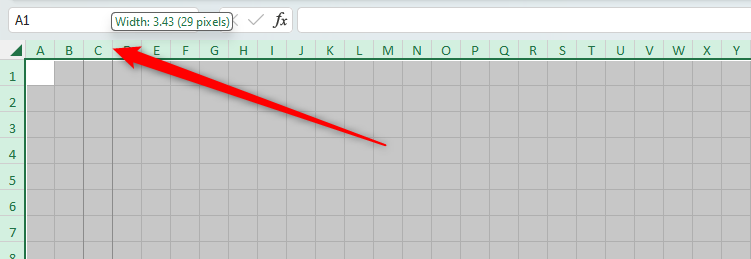
Once this decision is made, open Excel, select all the cells, and change their width and height so that you have suitably sized squares, making sure they’re big enough to allow for writing space, but not so big that your puzzle won’t fit onto one page.
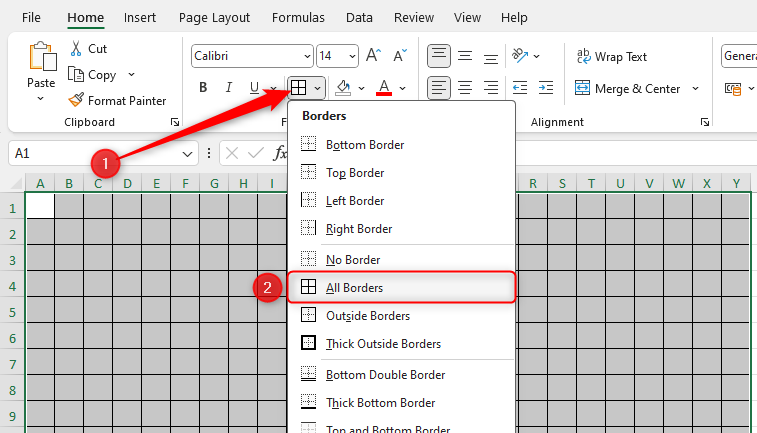
Then, select the area that will form your crossword grid, and in the Home tab on the ribbon, open the borders drop-down (grid icon) and click “All Borders.”
Step 2: Add Your Words
You’re now ready to add your words. You can either choose to follow a theme or use random words. I tend to find that following a theme makes things a bit more difficult as you add your words, especially if you have a large grid, so I prefer to create a general knowledge puzzle.
Every Word Must Cross
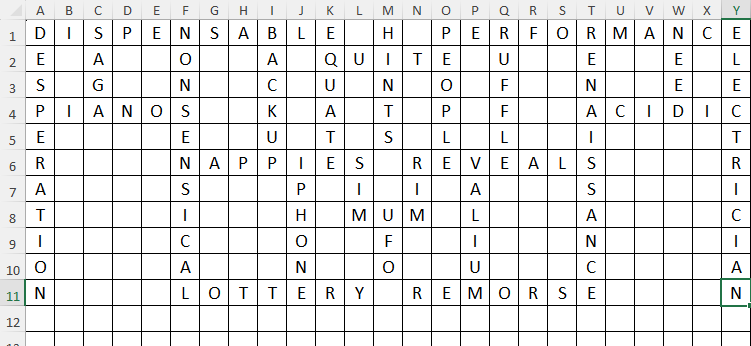
Let me start by emphasizing one golden rule—never have any hanging words. In other words, every word you add must cross another one. This means that each time your solver correctly works out one word, they’ve got some letters for the next word, and they will soon master a certain region of your puzzle. This is the whole premise of a crossword, so it must be respected at all times.
Aim for Symmetry
In my experience, the most challenging part of this process is making the crossword symmetrical—but it’s worth it. In the end, you’ll have an aesthetically pleasing and professional crossword. You can aim for one line of symmetry (such as the left matching the right), or two lines of symmetry (by making the top mirror the bottom, and the left mirror the right). In my example, I’m going to use two. Start in the top-left corner with a long word downwards and a long word across, and then mirror that structure in the top-right corner. Then, do the same in the bottom corners. Now, any time you add a word stemming from one corner, mirror it in all four corners.
But Don’t Add Words for the Sake Of It
Making your crossword symmetrical and trying to fill your grid with as many words as possible can tempt you into squeezing in words that you know, deep down, you’re not happy with. Writing a crossword often involves taking two steps forward and one step back—don’t be afraid to re-craft an area of your puzzle so that you’re completely happy with the outcome.
Limit Short Words
You want to avoid two-letter words and limit the number of times you use a three-letter word. In essence, most of your words should be at least four letters long, and the more long words you have, the more flexible you can be with your clues. This approach will also let you use those longer words to generate more words stemming from them.
Words to Avoid
Don’t obscure words that people mightn’t have encountered before. Getting your quizzer to correctly guess a tiny village in Sweden or a nineteenth-century Japanese art form will simply demotivate them and raise concerns about the solvability of your puzzle. Instead, you can use interesting words that come up in everyday life to fill in parts of the challenging words.
Think About Your Clues
As you add your words, think ahead about how you might lure your solver to guess them. Ask yourself, “How will I tantalize my quizzer with a clever clue?”—and if you can’t answer that question, choose another word. Another way to approach this is to use words with more than one meaning, which will give you more flexibility.
Step 3: Black Out Empty Squares
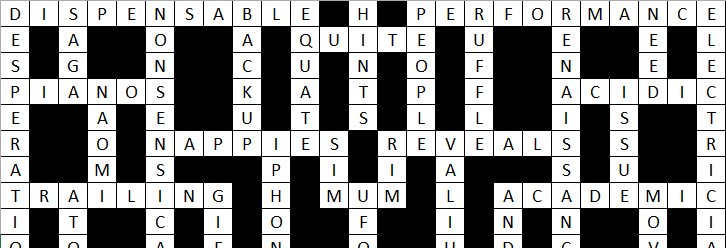
Having gone through the time-consuming process of adding, removing, and re-adding your words, the next step is particularly satisfying. After you’ve blacked out the empty squares in your puzzle, you’ll really see it taking shape.
To do this, click one of the empty squares, hold Ctrl, and then click the remaining empty squares. I like to do a few squares at a time so that I don’t have to start all over again if I accidentally select the wrong square. Then, open the color fill drop-down and go for black.
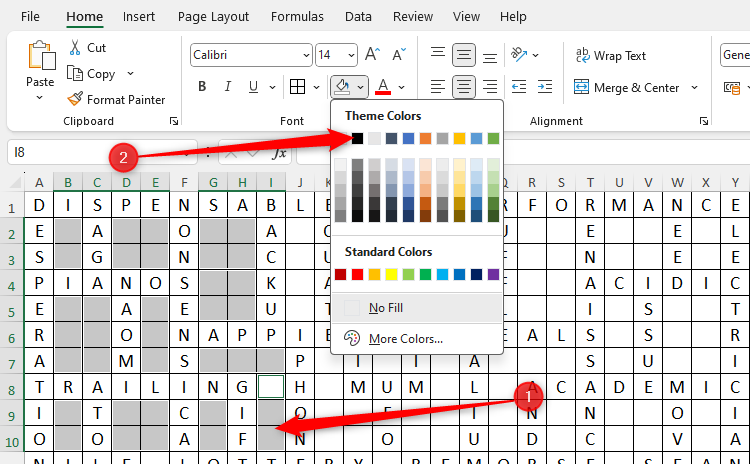
When you’ve filled in all the empty squares, take a moment to appreciate that much of the hard work is done!
Step 4: Add Your Numbers
In order to link your clues to your words, you now need to add numbers. Starting in the top-left corner and working along each row, type a number in front of the first letter of each new word (whether horizontal or vertical). On my crossword, I’ll start with “Desperation” and add the number “1” to the “D.” Then, moving along the top row, I’ll add the number “2” to the letter “S” in “Saga.”

This might seem a straightforward process—and it is—but I’ve often been caught out and had to go back and change all my numbers because I’d missed one. When you finish a row, go back across to make sure you’ve not missed any words.
Step 5: Write Your Clues
You now need to craft your clues to the words you’ve chosen. Start with the “Across” clues, and then do the “Down” clues using the numbers you added in the previous step. You should also add the number of letters in the word to your clue so your solver can consider solutions without having to look back and forth between the clues and the grid. Here’s what my clues for “Dispensable” and “Performance” (my first two horizontal words on the top row) will look like:

As well as single-word synonym-type clues like those used above, you can vary the types of hints you offer:
- Anagram: Can you mix the letters around to create a different word for your clue? If you use this method, type “(Anag)” after the clue.
- Fill in the blank: If you have a word that can fit into a well-known phrase, such as “weather” in “under the weather,” you can let your solver fill in the blank: “Under the ___ (7).”
- Definition: Offer a simple meaning of a word. For example, if the word is “epic,” I might type “Long story of heroic achievement.”
- Cryptic: These are clues with two parts. As an example, a clue for “Heart” might be “Hidden in the art of a human body.” See how the answer is hidden inside the words “the” and “art,” and the clue itself suggests that the answer is an internal body part.
- Quiz questions: You could write all your clues in the form of pub quiz questions, such as “What is the densest major body in the Solar System?” for “Earth.”
As you create your clues, strike a balance between challenging and achievable. You want your solver to have to think (sometimes outside the box), but you don’t want them to lose motivation.
Step 6: Remove the Words
You’re pretty much done! All you need to do now is remove the letters from your crossword.
First, duplicate the sheet in your workbook and call it “Answers.” Then, go back to your first sheet and remove all the letters from the squares, leaving the numbers in place.

Finally, format the numbers so that they’re in the top-left corner of their squares, and leave enough room for your solver to write their answers.

Step 7: Test Your Puzzle
Your final step is to make sure everything works. Save your work as a PDF to secure the formatting, and print the crossword to complete it by hand, having your computer next to you so you can make any necessary adjustments to your clues as you go.
And that’s it! The more crosswords you create, the quicker this process will become, and you’ll soon have a stack of puzzles to share with your family and friends .
Also read:
- [New] 2024 Approved Navigating the World of Video Screen Capture
- [New] Access Unparalleled Image Clarity for No Charge for 2024
- [New] In 2024, Swiftly Mastering the Art of Smoothing iPhone Shots (Four Methods)
- 2024 Approved Alliance of Creativity Brands and YouTube's Fusion
- Free Guide to Navigating and Hosting Google Meet Sessions Effectively
- In 2024, 10 Easy-to-Use FRP Bypass Tools for Unlocking Google Accounts On Xiaomi 14
- In 2024, The Ultimate Guide to Facetune Photo Enhancement
- In 2024, Two Ways to Track My Boyfriends Infinix Note 30 VIP without Him Knowing | Dr.fone
- In 2024, Unlocking Apple iPhone 6s Lock Screen 3 Foolproof Methods that Actually Work
- Step-by-Step Instructions to Fetch and Install Updated Epson XP-440 Drivers Fast
- Testing & Insights on Anker's High-Performance Outdoor Torch for Expeditions
- The TCL 32S325 Roku TV (2019): Clever Performance in an Attractive Package
- The Ultimate Guide to the Luxurious Amazon Kindle Oasis Experience
- Top Considerations Before Purchasing a Camcorder
- Ultimate Guide to TCL 50S425 - The 201
- Ultimate Midland GXT1000VP4 Headset Analysis – Expert Audio Clarity Insights
- Ultimate Review of the D-Link Powerline XT: Quick Configuration for Rapid Networking Performance
- Understanding AppleCare Plus Worth: 5 Key Reasons for Choosing It
- Unleashing Potential: A Detailed Review of AmazonBasics' Versatile 7-Port USB Charger
- Title: Mastering the Art of Excel-Based Crossword Creation: A Step-by-Step Guide
- Author: Steven
- Created at : 2025-02-14 04:17:59
- Updated at : 2025-02-19 19:52:27
- Link: https://buynow-marvelous.techidaily.com/mastering-the-art-of-excel-based-crossword-creation-a-step-by-step-guide/
- License: This work is licensed under CC BY-NC-SA 4.0.